Errors in measurement = Measured Value – True value
Error is the different between the measured value and the true value.
The errors in measurement can be expressed either as an absolute error or an relative error.
Absolute error
The absolute error is classified into two types:
- True absolute error
- Apparent absolute error
True absolute error : Algebraic difference between the results of measurement to the true value of the quantity measured is called true absolute error.
Apparent absolute error : While taking the series of errors in measurement, the algebraic difference between one of the results of measurement to the arithmetic mean is called as apparent absolute error.
Relative error
Relative error is defined as the results of the absolute error and the value of comparison used for calculation of that absolute error. The comparison may be true value or conventional true value or arithmetic mean for series of measurement.
Types of Error
The errors can be classified into
1. Static errors
(i) Characteristic errors
(ii) Reading errors
(iii) Environmental errors
2. Loading errors
3. Dynamic error
Static error : It causes due to the physical nature of the various components of the measuring system. The static errors due to environmental effect and the other properties which influence the apparatus are also reasons for static errors.
Characteristic error : The deviation of the output of the measuring system from the nominal performance specifications is called characteristic error.
The linearity, repeatability, hysteresis and resolution are part of the characteristic error.
Reading error: It is exclusively applied to the read out device. The reading error describes the factors parallax error and interpolation error.
The use of mirror behind the readout indicator eliminates the occurrence of parallax error.
Interpolation error is a reading error resulting from the inexact evaluation of the position of index. The use of digital readout devices eliminates the subjective error.
Environmental error : Every instrument is manufactured and calibrated at one place and it is used in some other place where the environmental conditions such as temperature, pressure, and humidity change.
So, the change in environment influences the readings of the instrument. This change in environment is called environment error. By following the below conditions, the environmental errors are eliminated.
- Monitoring the atmospheric conditions.
- By calibration of instrument at the place of use.
- Automatic devices are used to compensate the effects.
Loading error : As the measured quantity looses energy due to the act of measurement, an error is introduced known as loading error.
Loading means the measuring instrument always taking the input from the signal source. Due to this, the signal source will always be altered by the act of measurement known loading.
Example : If steam flows through the nozzle, it is very difficult to find the perfect flow rate. This is called loading error.
Dynamic error : This is due to time variations in the measurand. The dynamic errors are caused by inertia, friction and clamping action. The dynamic errors are mainly classified into
- Systematic errors or Controllable errors
- Random errors
Systematic error : The systematic are constant and similar in form. These are controllable in both their sense and magnitude. The systematic errors are easily determined and reduced, hence these are also called as controllable errors.
Systematic errors includes
1. Calibration errors
2. Ambient or Atmospheric conditions
3. Avoidable errors, and
4. Stylus pressure
Calibration error : Calibration is a process of giving a known input to the measurement system and also taking necessary actions to see that the output of the measurement system matches with its input.
If the instrument is not calibrated, the instrument will show very high degree of error. Calibration errors are fixed errors.
Ambient error : This is due to variation in atmospheric conditions (Example: Pressure, Temperature and moisture) normally the instruments are calibrated at particular pressure and temperatures. Temperature will not be equal at all places. If the temperature and pressure vary, the ambient error will form. Standard temperature of 20°C and pressure of 760mm of
Hg are taken as ambient conditions.
Avoidable errors : This type of error is due to parallax, non-alignment of work piece centers, and improper location of measuring instrument. For example placing a thermometer in sunlight to measure air temperature will cause the instrument location error.
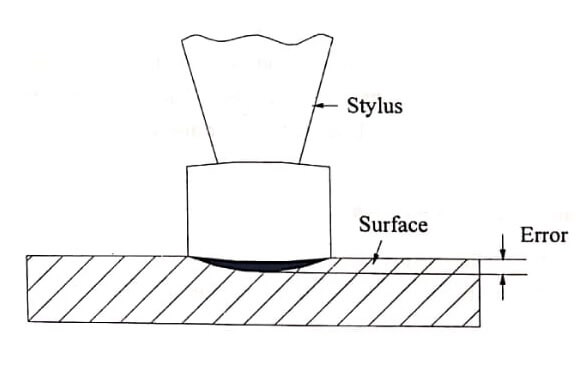
Stylus pressure : Whenever a component is measured under particular pressure, the deformation of the work piece and surface deflection will occur. The pressure involved is generally small but this is sufficient to cause appreciable deformation on stylus and the work piece.
Random error : These types of errors occur randomly and reason for this type of errors cannot be specified.
