Measurement is a comparison of a given unknown quantity with one of its predetermined standard values adopted as a unit. Metric system of measurement provides us with means of describing various phenomena in quantitative terms. It plays an important role in all branches of engineering and science. There are two important requirements of the measurement:
- The standards used for comparison must be accurate and internationally accepted, and
- The apparatus or instrument and the process used for comparison must be provable.
The fig represents the fundamental measuring process.
The word measurand is used to designate the particular physical parameter being observed, unknown quantity which is to be measured. It is the input quantity to the measuring process.
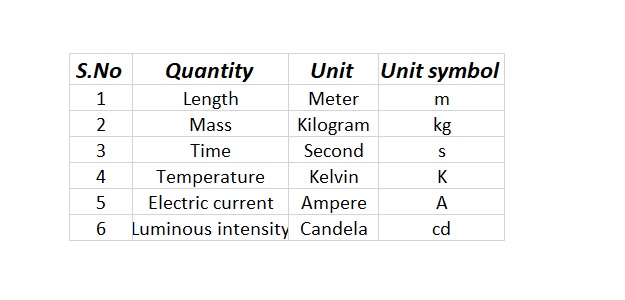
This unknown quantity is compared with the available standard quantities such length, mass, time and it produces a result.
Some of the significance or applications of measurement are described below.
- Measurement provides the fundamental basis for research and development activities. In research activity, the experimental part is based on measurement.
- Measurement is a fundamental element of any automatic control system. In control system, discrepancy or error between the actual value and described value of a variable is to be determined.
- Measurement is used to evaluate the performance of any plant or a process. For example, in modern power plant, temperature, pressure, vibrational amplitudes, etc, must be constantly monitored by the measurement to ensure the proper performance of the system.
- Measurement is also the basis for commercial activities such as production, prizing, sale, and purchase.
- Verification of physical phenomenon and theories require extensive experimentation the measurement.
- Measurement is used to monitor data in the interest of health and safety, e.g.. forecasting weather and predicting the onset of earthquakes.
- It establishes the validity of design and determines data for new and improved design.
Need for Measurement
- To determine the true dimensions of a part.
- To increase our knowledge and understanding of the world.
- To ensure public health and human safety.
- To convert physical parameters into meaningful numbers.
- To test whether the elements that constitute the system function as per the design.
- To evaluate the performance of a system.
- To study some basic laws of nature.
- To ensure interchangeability with a view for promoting mass production.
- To evaluate the response of the system to a particular point.
- To check the limitations of theory in practical situations.
- To establish the validity of design and for finding new data and new designs.
Methods of Measurement
There are two basic methods of measurements:
- Direct comparison with primary or secondary Standard
- Indirect comparison with a standard through calibration system
- Comparative method
- Coincidence method
- Fundamental method
- Contact method
- Transposition method
- Complementary method
- Deflection method.
Direct method – Metric System of Measurement
In direct comparison, the parameter to be measured is directly compared with either a primary standard or a secondary standard. In this method, the comparison is done with a standard with the help of calibrated systems. Direct methods are quite common for the measurement of physical quantities like length, mass and time. For example, if we want to measure the length of a steel rod, we would probably use a steel tape or scale. We are comparing the length of the rod with the standard length, and finding the bar which is so many times long because that many units on the standard have the same length as the bar. Thus, we have determined the length by direct comparison. Generally, the direct comparison is not always the most accurate or the best, it is not sensitive enough also. Measurement by direct comparison is less common than the measurement by indirect comparison.
Measurements may be classified as primary, secondary and tertiary based on the complexity of the measurement system.
In primary measurement, any physical parameters are measured by comparing directly with reference standards. For example
- Matching of two lengths when determining the length of an object with a meter rod.
- Matching of two weights when determining the mass of the grossary items.
The primary measurement provides subjective information only. Here, the observer indicates only that one rod is longer than the other rod.
One object contains more or less mass than the other. The primary measurement is under the category of direct measurement.
A secondary measurement involves only one translation to be done on the quantity under the measurement. For example, if we want to measure the pressure of a gas in a container, it may not be observable.
Therefore, it requires,
- An instrument to convert pressure into displacement, and
- The change in displacement units equivalent to known change in pressure.
Therefore, the primary signal is first transmitted to a transducer where it is effected to translate into a length change in pressure gauge.
Then the secondary signal of length change is transmitted to the observer’s eye.
A tertiary measurement involves two translations. The measurement of static pressure by a bourdon tube pressure gauge is a typical example of tertiary measurement. During the measurement of pressure, the free end deflects slightly. This small deflection is made larger by using rack and pinion arrangement for better displaying and reading.
Indirect method
Indirect comparison makes use of some form of transducing device which converts the quantity to be measured into an analogous signal. The analogous signal is then processed by intermediate devices and displayed on the output device as known function of the input. Indirect methods for measurements are used in those cases where the direct measurement is difficult. In this method, an empirical relationship is generally established between the metric system of measurement mode and result mode that are desired.
Comparative method
In this method, the quantity to be measured is compared with other known value. Example: Comparators.
Coincidence method
The value of the quantity to be measured and determined is coincided with certain lines and signals.
Fundamental method
Measuring a quantity a is directly related with the definition of that quantity.
Contact method
The sensor or measuring tip of the instrument touches the area (or) diameter (or) surface to be measured. Example: Vernier caliper.
Transposition method
In this method, the quantity to be measured is first balanced by a known value and then it is balanced by other new known value. Example: Determination of mass by balancing methods.
Complementary method
The value of quantity to be measured is combined with known value of the same quantity. Example: Volume determination by liquid displacement.
Deflection method
The value to be measured is directly indicated by a deflection of pointer. Example: pressure measurement.
Metric System of Measurement – Generalized Measuring System
There are number of measuring instruments used in practice. Therefore, it is necessary to identify the common features or the basic elements of a generalized measuring system.
A generalized measuring system consists of the following common elements:
- Primary sensing element
- Variable conversion element
- Variable manipulation element
- Data transmission element
- Data processing element
- Data presentation element
Fig. indicates the functional elements of an instrument which are indicated by various blocks.

Primary Sensing Element
It is the first element which receives energy from the metric system of measurement medium and produces an output corresponding to the measurand. This output is then converted into an analogous electrical signal by transducer.
Variable Conversion Element
It converts the output electrical signal of the primary sensing element (which may be a voltage, frequency or some other electrical parameter) into a more suitable form without changing the information content of the input signal. In some instrument, there is no need of using variable conversion element while some other instruments require variable conversion element.
Variable Manipulation Element
This element is used to manipulate the signal presented to it and preserving the original nature of the signal. In other words, it amplifies the input signal to the required magnification. For example, an electronic voltage amplifier receives a small voltage as input and produces greater magnitude of voltage as output. A variable manipulation element does not
necessarily follow a variable-conversion element, it may precede it.
Data Transmission Element
It transmits the data from one element to the other. It may be as simple as shaft and gear assembly system or as complicated as a telemetry a system which is used to transmit signal from one place to another.
Data Processing Element
It is an element which is used to modify the data before displayed or finally recorded. It may be used for the following purposes:
- To convert the data into useful form.
- To separate the signal hidden in noise.
- It may provide corrections to the measured physical variables to compensate for zero offset, temperature error, scaling etc.
Data Presentation Element
These are the elements that they finally communicate the information of measured variable to a human observer for monitoring, control or analysis purpose. The value of the measured variable may be indicated by an analog indicator (pointer and a scale), digital indicator (ammeter, voltmeter, etc) or by a recorder (magnetic taps, camera, T.V. equipment, storage type C.R.T.)
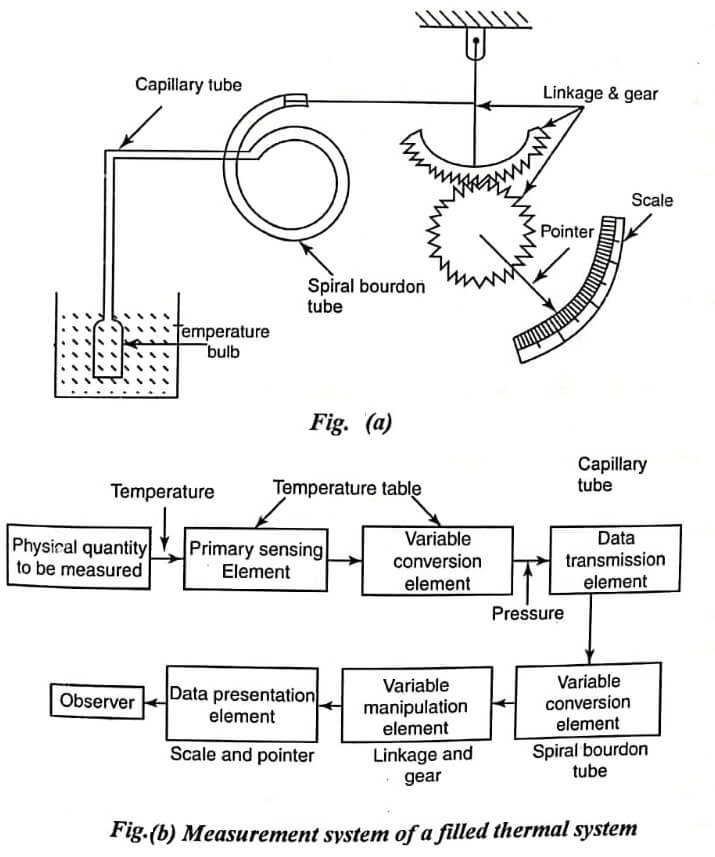
As an example of a measurement system, consider a filled thermal system used for process temperature measurement as shown in fig. The liquid or gas filled temperature bulb acts as a primary sensing element and variable conversion element.
It senses the input quantity (i.e. temperature) and converts it into a pressure built up within the bulb. This pressure is transmitted through the capillary tube (which acts as a data transmission element) to a spiral bourdon type pressure gauge. It acts as a variable conversion element which converts pressure into displacement.
The displacement is manipulated by the linkage and gearing arrangement to give a larger pointer deflection. This arrangement acts as a variable manipulation element. The pointer and scale indicate the temperature, thus serving as data presentation elements.
