Creating electrochemical etching stencils is a crucial step in marking metal objects with logos, serial numbers, or other identifiers. These stencils guide the etching process, where electricity and electrolyte solutions remove metal selectively to create permanent marks. This blog post will cover how to make high-quality, durable stencils for electrochemical etching.
Step-by-Step Guide to Making Electrochemical Etching Stencils
1. Understand the Basics of Electrochemical Etching
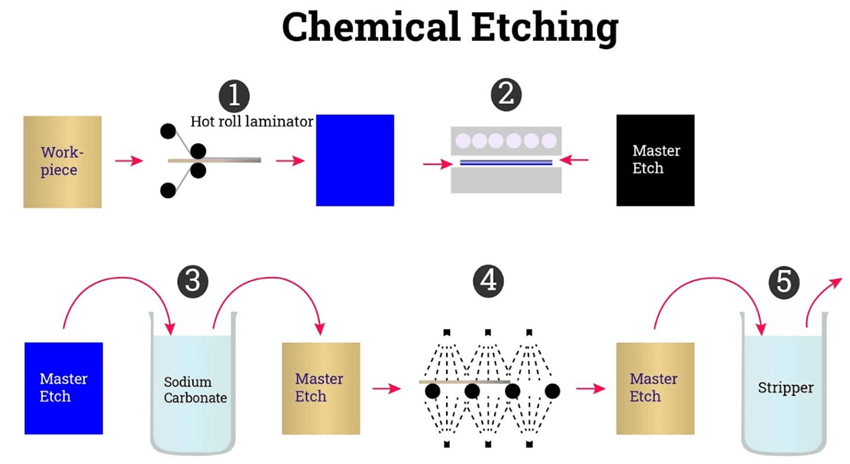
Before diving into stencil making, it’s essential to understand how electrochemical etching works. This process involves passing an electric current through an electrolyte solution to remove metal from the surface in specific patterns. The stencil serves as a mask that protects certain areas while exposing others, creating a precise and permanent etch.
2. Choose Your Materials
- Stencil Material: Typically, stencils are made from vinyl, mylar, or specialized films that can withstand the electrochemical etching process.
- Design Software: Software like Adobe Illustrator, CorelDRAW, or free alternatives like Inkscape can help you design precise stencils.
- Cutting Equipment: A vinyl cutter or laser cutter is ideal for cutting detailed stencil designs. Alternatively, a craft knife or precision cutter can work for simpler designs.
- Adhesive Sheets (Optional): To ensure that the stencil stays securely in place during the etching process, adhesive sheets may be necessary.
3. Design Your Stencil
The first step in creating a stencil is designing the pattern you want to etch. Use vector-based design software to create clean and precise lines. Ensure the design is clear, as too intricate details may not transfer well onto the stencil material.
- Set Up Your Artwork: Ensure your artwork is correctly scaled to fit the area you intend to etch. Consider the size, spacing, and thickness of lines to achieve the best results.
- Convert Text to Outlines: If your design includes text, convert the text to outlines or paths. This ensures that any fonts used are rendered accurately in the final stencil.
- Mirror the Design (If Necessary): If you want the etching to appear a certain way on the material, you may need to mirror the design before cutting.
4. Cut the Stencil
Once your design is ready, the next step is cutting it out on your chosen stencil material. If using a vinyl cutter or laser cutter, load the material into the machine and follow the software’s instructions for cutting.
- Test Cut: It’s always a good idea to perform a test cut on a small piece of stencil material to ensure the cutting depth and pressure are correct.
- Weeding the Stencil: After cutting, remove the excess material around your design. This process, known as weeding, reveals the actual stencil that will be used for etching.
5. Prepare the Metal Surface
Before applying the stencil, ensure the metal surface is clean and free from oils, dirt, or rust. Use a degreaser or isopropyl alcohol to clean the surface thoroughly. A clean surface ensures better adhesion of the stencil and more consistent etching results.
6. Apply the Stencil to the Metal
Carefully position the stencil on the cleaned metal surface. If using an adhesive stencil, press it firmly onto the metal to eliminate any air bubbles or wrinkles. If the stencil is non-adhesive, secure it in place using masking tape or another method.
- Mask Off Exposed Areas: Use masking tape or another protective material to cover any areas of the metal you do not want to be etched.
7. Perform the Electrochemical Etching
With the stencil in place, set up your electrochemical etching equipment:
- Electrolyte Solution: Choose the appropriate electrolyte solution for the type of metal you’re etching (e.g., saltwater for stainless steel).
- Power Supply: Connect the power supply according to the manufacturer’s instructions, typically with a positive lead to the etching pad and a negative lead to the metal piece.
- Apply Etching Pad: Moisten the etching pad with the electrolyte solution and press it firmly onto the stencil-covered metal surface.
- Etch Time: Depending on the desired depth and metal type, the etching process may take anywhere from a few seconds to several minutes.
8. Remove the Stencil and Clean the Metal
Once the etching is complete, carefully remove the stencil. Clean the metal surface with water or a neutralizing solution to remove any remaining electrolyte. Dry the metal thoroughly to prevent any oxidation or corrosion.
9. Inspect and Finish the Etched Design
Inspect the etched area for consistency and depth. If needed, the process can be repeated to achieve a deeper etch. Finally, polish the etched area and the surrounding metal for a professional finish.
Tips for Better Stencil Making
- Choose the Right Thickness: A stencil that is too thin may tear, while one that is too thick may not adhere well to the metal surface.
- Avoid Overly Intricate Designs: Fine details may not etch cleanly and could result in smudged or incomplete etches.
- Use High-Quality Stencil Material: This ensures the stencil withstands multiple uses, especially if you are producing a series of etched items.
| Read More Topics |
| The future of learning virtual lab electrochemical cells |
| A chemist assembles the following electrochemical cell |
| Energy management system in electrical vehicles |
