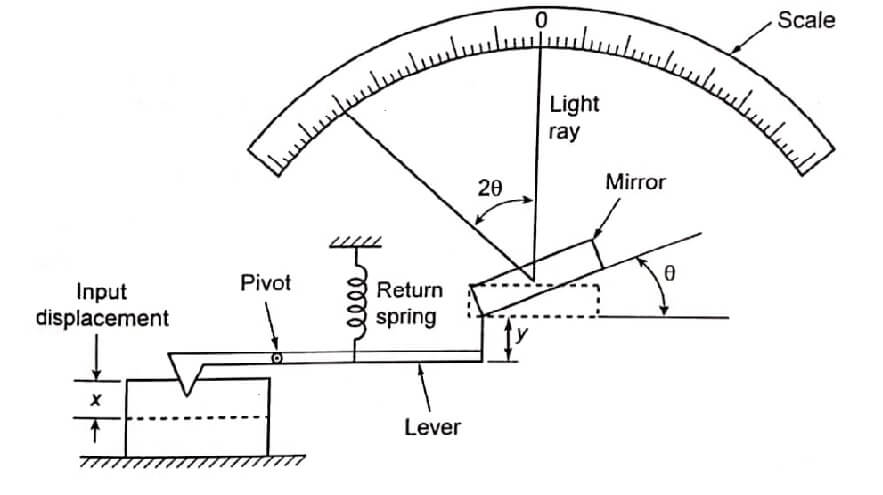
In this type of optical comparator, a small plunger displacement is amplified by both mechanical and optical system. The amplification is first done by a pivoted lever and then by simple optical system.
Construction details:
The optical comparator consists of the following parts such as
- Pivoted lever
- Objective lens
- Scale
- Plunger
- Table and Base, and
- Mirror
Pivoted lever : The pivoted lever amplifies the plunger movement mechanically. It is pivoted near the plunger. One end is fitted with the plunger and other end is fitted with a mirror.
Objective lens : The main function of objective lens is to convert the incoming light rays from the source into parallel beams.
Screen and Scale : It is a final display device from which the readings can be obtained. This is nothing but a semi transparent glass.
Plunger : It is a reciprocating member. During the measurement, the plunger actuates.
Table : The work is placed on the table to carry out the task.
Base : It is a rigid support over which the table is mounted.
Mirror : It reflects the incoming light rays from the source which is hinged at the other end of the lever.
Working principle
During the measurement, the vertical displacement of the plunger is magnified by the ratio of the lever arm. The lever tilts the mirror about its hinge to again magnify. The light rays from the lamp are condensed by a condensing less.
Then the condensed light falls on the objective lens. Here, the light rays are converted into parallel beams. Again the parallel beams of light ray fall on the mirror.
The mirror reflects the light rays on a screen. As the screen is a semi transparent glass, the image of the work placed on the table will be reflected. Then the magnified master drawing is placed over the screen. Now, the projected image is compared with the master drawing.
This type of comparator can also be used for inspecting small parts like screw threads gear teeth, saw teeth, cutting tools, needles, cam profiles etc.
In this type, any difference between two dimensions is amplified by a lever to give a vertical displacement and an angular displacement. For example, the difference ‘x’ between two dimensions may be used to actuate a lever to displace by ‘y’.
Same displacement causes a ray of light, which was initially at zero angle to get displaced by 2θ because, the mirror is deflected by ‘θ’. This magnified reading is a measure of the displacement x. Here also, the scale is calibrated by gauge blocks.
Advantages
- Small parts can also be inspected.
- Different magnifications can be obtained by adjusting the projection lens and the position of the mirror.
- See More : Mechanical Comparator
- See More : Definition of Metrology
- See More : Voltage Regulation


