Nondestructive testing (NDT) is the examination of an object or material with technology that does not affect its future usefulness. It is an approach to testing that involves in evaluating the weld without causing physical damage.
The terms Nondestructive examination (NDE), Nondestructive inspection (NDI), and Nondestructive evaluation (NDE) are also commonly used to describe this technology.
As it allows inspection without interfering with a product’s final use, Nondestructive testing (NDT) provides an excellent balance of quality control and cost-effectiveness.
The destructive tests are often used to determine the physical properties of materials such as impact resistance, ductility, yield and ultimate tensile strength, fracture toughness and fatigue strength but discontinuities and differences in material characteristics are more effectively found by NDT.
There are a variety of NDT methods that can be used to evaluate materials, components and welded joints. All NDT methods share several common elements. These elements are as follows.
- Some source of probing energy or some type of probing medium
- Discontinuity must cause a change or alteration of the probing medium
- Some means of detecting this change
- Some means of indicating this change
- Some means of observing and recording this indication so that an interpretation can be made.
A variety of non-destructive testing methods have been developed. Each one having advantages and limitations making it more or less appropriate for a given application.
With the variety of NDT methods available, it is important to select the method that will provide the required assurance and results. The following five basic methods are commonly used to examine finished welds.
»Visual Inspection (VT)
»Dye-penetrant inspection or Liquid penetration inspection (LPI)
»Magnetic particle inspection (MPI)
»Radiographic inspection (RT)
»Ultrasonic inspection (UT)
Visual Inspection
Visual inspection is the oldest and most common form of NDT. It is most widely used welding inspection method. This inspection procedure may be greatly enhanced by the use of appropriate combinations of magnifying instruments, borescopes, light sources, video scanners and other similar devices.
The use of optical aids for visual inspection is beneficial and recommended. Optical aids magnify defects that cannot be seen by the unaided eye and also permit visual inspection in inaccessible areas.
Common defects such as spatter, excessive built-up, incomplete slag removal, lack of root penetration, distortion, undercut and surface cracks can be detected by a visual inspection of the welds. Cracks may also be detected by hitting the casting with a mallet and listening to the quality of the tone.
Visual inspection equipment
The following visual inspection, equipment are commonly used for inspecting welded joints.
- Simple magnifier
- Fillet gauges / weld gauge.
Simple magnifier : A single converging lens of the simplest form of a microscope is often referred to as a simple magnifier. Magnification of a single lens is determined by the equation M = 10/f
Where,
M is the magnification
f is the focal length of the lens in inches and
10 is a constant that represents the average minimum distance at which objects can be distinctly seen by the unaided eye.
Using the equation, a lens with a focal length of 5 inches has a magnification of 2 or is said to be a two-power lens.
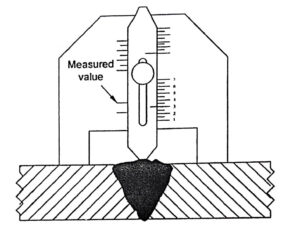
Fillet gauges / weld gauge : Fillet gauges are used to measure the legs of the weld, convexity of weldment, concavity of weldment and -flatness. The procedure for measuring these parameters is as follows:
To determine the size of a fillet weld, the weld gauge is placed against the toe. of the fillet weld and pointer is slided out until it touches structure as shown in image. Now, the pointer indicates the size of the fillet weld.
To check the permissible tolerance of convexity of the weldment, the weld gauge is placed against the structure and pointer is slided until it touches face of the fillet weld as shown in image.
The maximum convexity should not be greater than indicated by scale as indicated by maximum convexity scale as indicated by arrow for the size of filler being checked.
To check the permissible tolerance of concavity and under fill of the weldment, the weld gauge is placed against the structure and the pointer is slided until it touches face of the fillet weld as shown in image.
If the pointer does not touch as shown, the fillet requires additional weld metal.
To check the permissible tolerance of reinforcement of the weldment, the weld gauge is placed a in such a way that the reinforcement is between legs of gauge and the pointer is slided until it touches face of the fillet weld as shown in image.
Advantages : Nondestructive Testing
- It is simple, easy to apply and quickly carried out.
- It is usually low in cost.
Limitations
- Only surface defects are detectable.
- Welding inspector must also decide if additional tests are warranted.
| Read More Topics |
| Gyroscopic effect on naval ship |
| Stability of four wheel moving |
| Precessional angular motion |

