Bend test is one of the commonly used destructive tests to determine the ductility and soundness (for the presence porosity, inclusion, penetration and other macro size internal weld discontinuities) of the weld joint produced using under one set of welding conditions.
There are following two types of bend test:
- Free bend test
- Guided bend test
Free bend test:
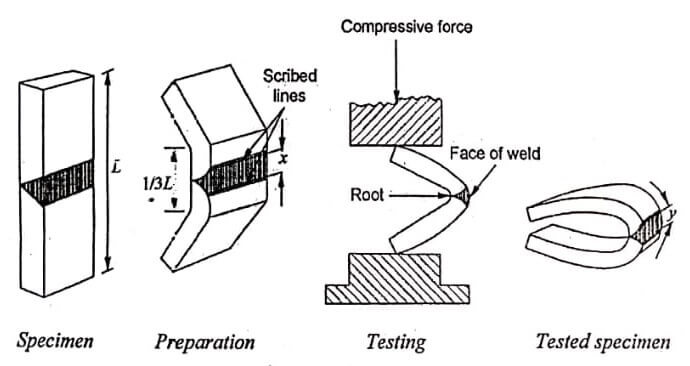
The free bend weld testing approach has been devised to measure the ductility of the weld metal deposited in a weld joint. A physical weld testing specimen is machined from the welded plate with the weld located as shown.
Each corner lengthwise of the specimen shall be rounded in a radius not exceeding one-tenth of the thickness of the specimen. Two scribed lines are placed on the face 1.6 mm from the edge of the weld. The distance between these lines is measured and recorded as the initial distance x as. The ends of the test specimen are then bent through angles of about 300 and these bends are being approximately one-third of the length in from each end. The weld is thus located centrally to ensure that all of the bending occurs in the weld.
The specimen bent initially is then placed in a machine capable of exerting a large compressive force as shown and bent until a crack greater than 1.6 mm in any dimension appears on the face of the weld. If no cracks appears, bending is continued until the specimens 6.4 mm thick or under can be tested in vise.

After bending the specimen to the point where the test bend is concluded, the distance between scribed lines on the specimen is again measured and recorded as the distance y. Then percentage elongation is calculated. The usual requirements for passing this test are that the minimum elongation be 15% and that no cracks greater than 1.6 mm in any dimension exist on the face of the weld.
The free bend test is being largely replaced by the guided bend test where the required testing equipment is available.
Guided bend test:
The quality of the weld metal at the face and root of the welded joint as well as the degree of penetration and fusion to the base metal are determined by means of guided bend tests. It also shows the efficiency of the weld.
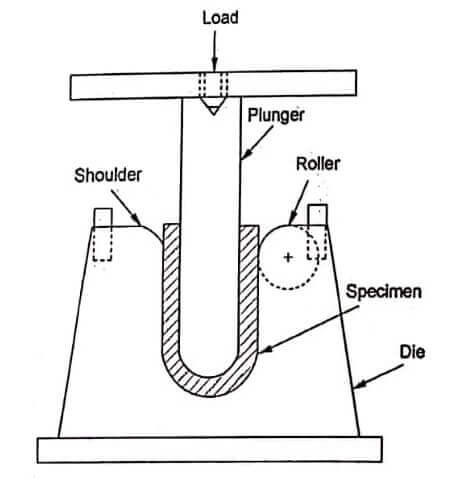
This type of physical weld testing is made in a jig. These test specimens are machined from welded plates and the thickness of which must be within the capacity of the bending jig. The test specimen is placed across the supports of the die which is the lower portion of the jig. The plunger operated from above by a hydraulic jack or other device causes the specimen to be forced to assure the shape of the die.
For bend test, the load is increased until cracks start to appear on face or root of the weld for face and root bend test respectively and angle of bend at this stage is used as a measured of ductility of weld joints. Higher is bend angle greater is ductility of the weld. To fulfill the requirements of this test, the specimens must bend 1800and, to be accepted as passable, no cracks greater than 3.2 mm in any dimension should appear on the surface. Fraction surface of the joint from the face/root side due to bending reveals the presence of internal weld discontinuities if any.
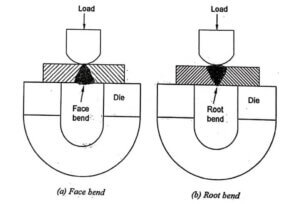
Free bending of the weld joint can be done from face or root side depending upon the purpose. The face bend tests are made in the jig with the face of the weld in tension (on the outside of the bend). The root bend tests are made with the root of the weld in tension (on outside of the bend). The root side bending shows the lack of penetration and fusion if any at the root.
Nick Bend Test
The nick break test has been devised to determine if the weld metal of a welded but joint has any internal defects such as slag inclusions, gas pockets, poor fusion and oxidized or burnt metal.
The specimen is obtained from a welded butt joint either by machining or cutting with an oxyacetylene torch. Each edge of the weld at the joint is slotted by means of a saw cut through the center. The piece thus prepared is bridged across two steel blocks and stuck with a heavy hammer until the section of the weld between slots fractures.

The metal thus exposed should be completely fused and free from slag inclusions. The size of any gas pocket must not be greater than 1.6 mm across the greater dimension and the number of gas pockets or pores per square inch (64.5 mm3) should not exceed 6.
Bend Weld Testing
Another break test method is used to determine the soundness of fillet welds. It is the fillet weld break test. This type of testing involves breaking a sample fillet weld that is welded on one side only. A force, by means of a press or testing machine blows of a hammer, is applied to the apex of the V shaped specimen until the filled weld ruptures. The surfaces of the fracture will then be examined for soundness. This type of weld inspection can detect such items as lack of fusion, internal porosity and slag inclusions. This testing method is often used in conjunction with the acid etch test.
| Read More Topics |
| Types of locators in jig |
| Locating and clamping |
| Pneumatic and hydraulic actuation |
| Laser beam welding |


